
CHOOSING A VULCAN OVEN MODEL
Which Vulcan grill oven model is most suitable for your needs?
First, you need to determine the oven size. There are 4 main size options:
| Model | Output (servings) | External dimensions, mm | Grill grate dimensions, mm |
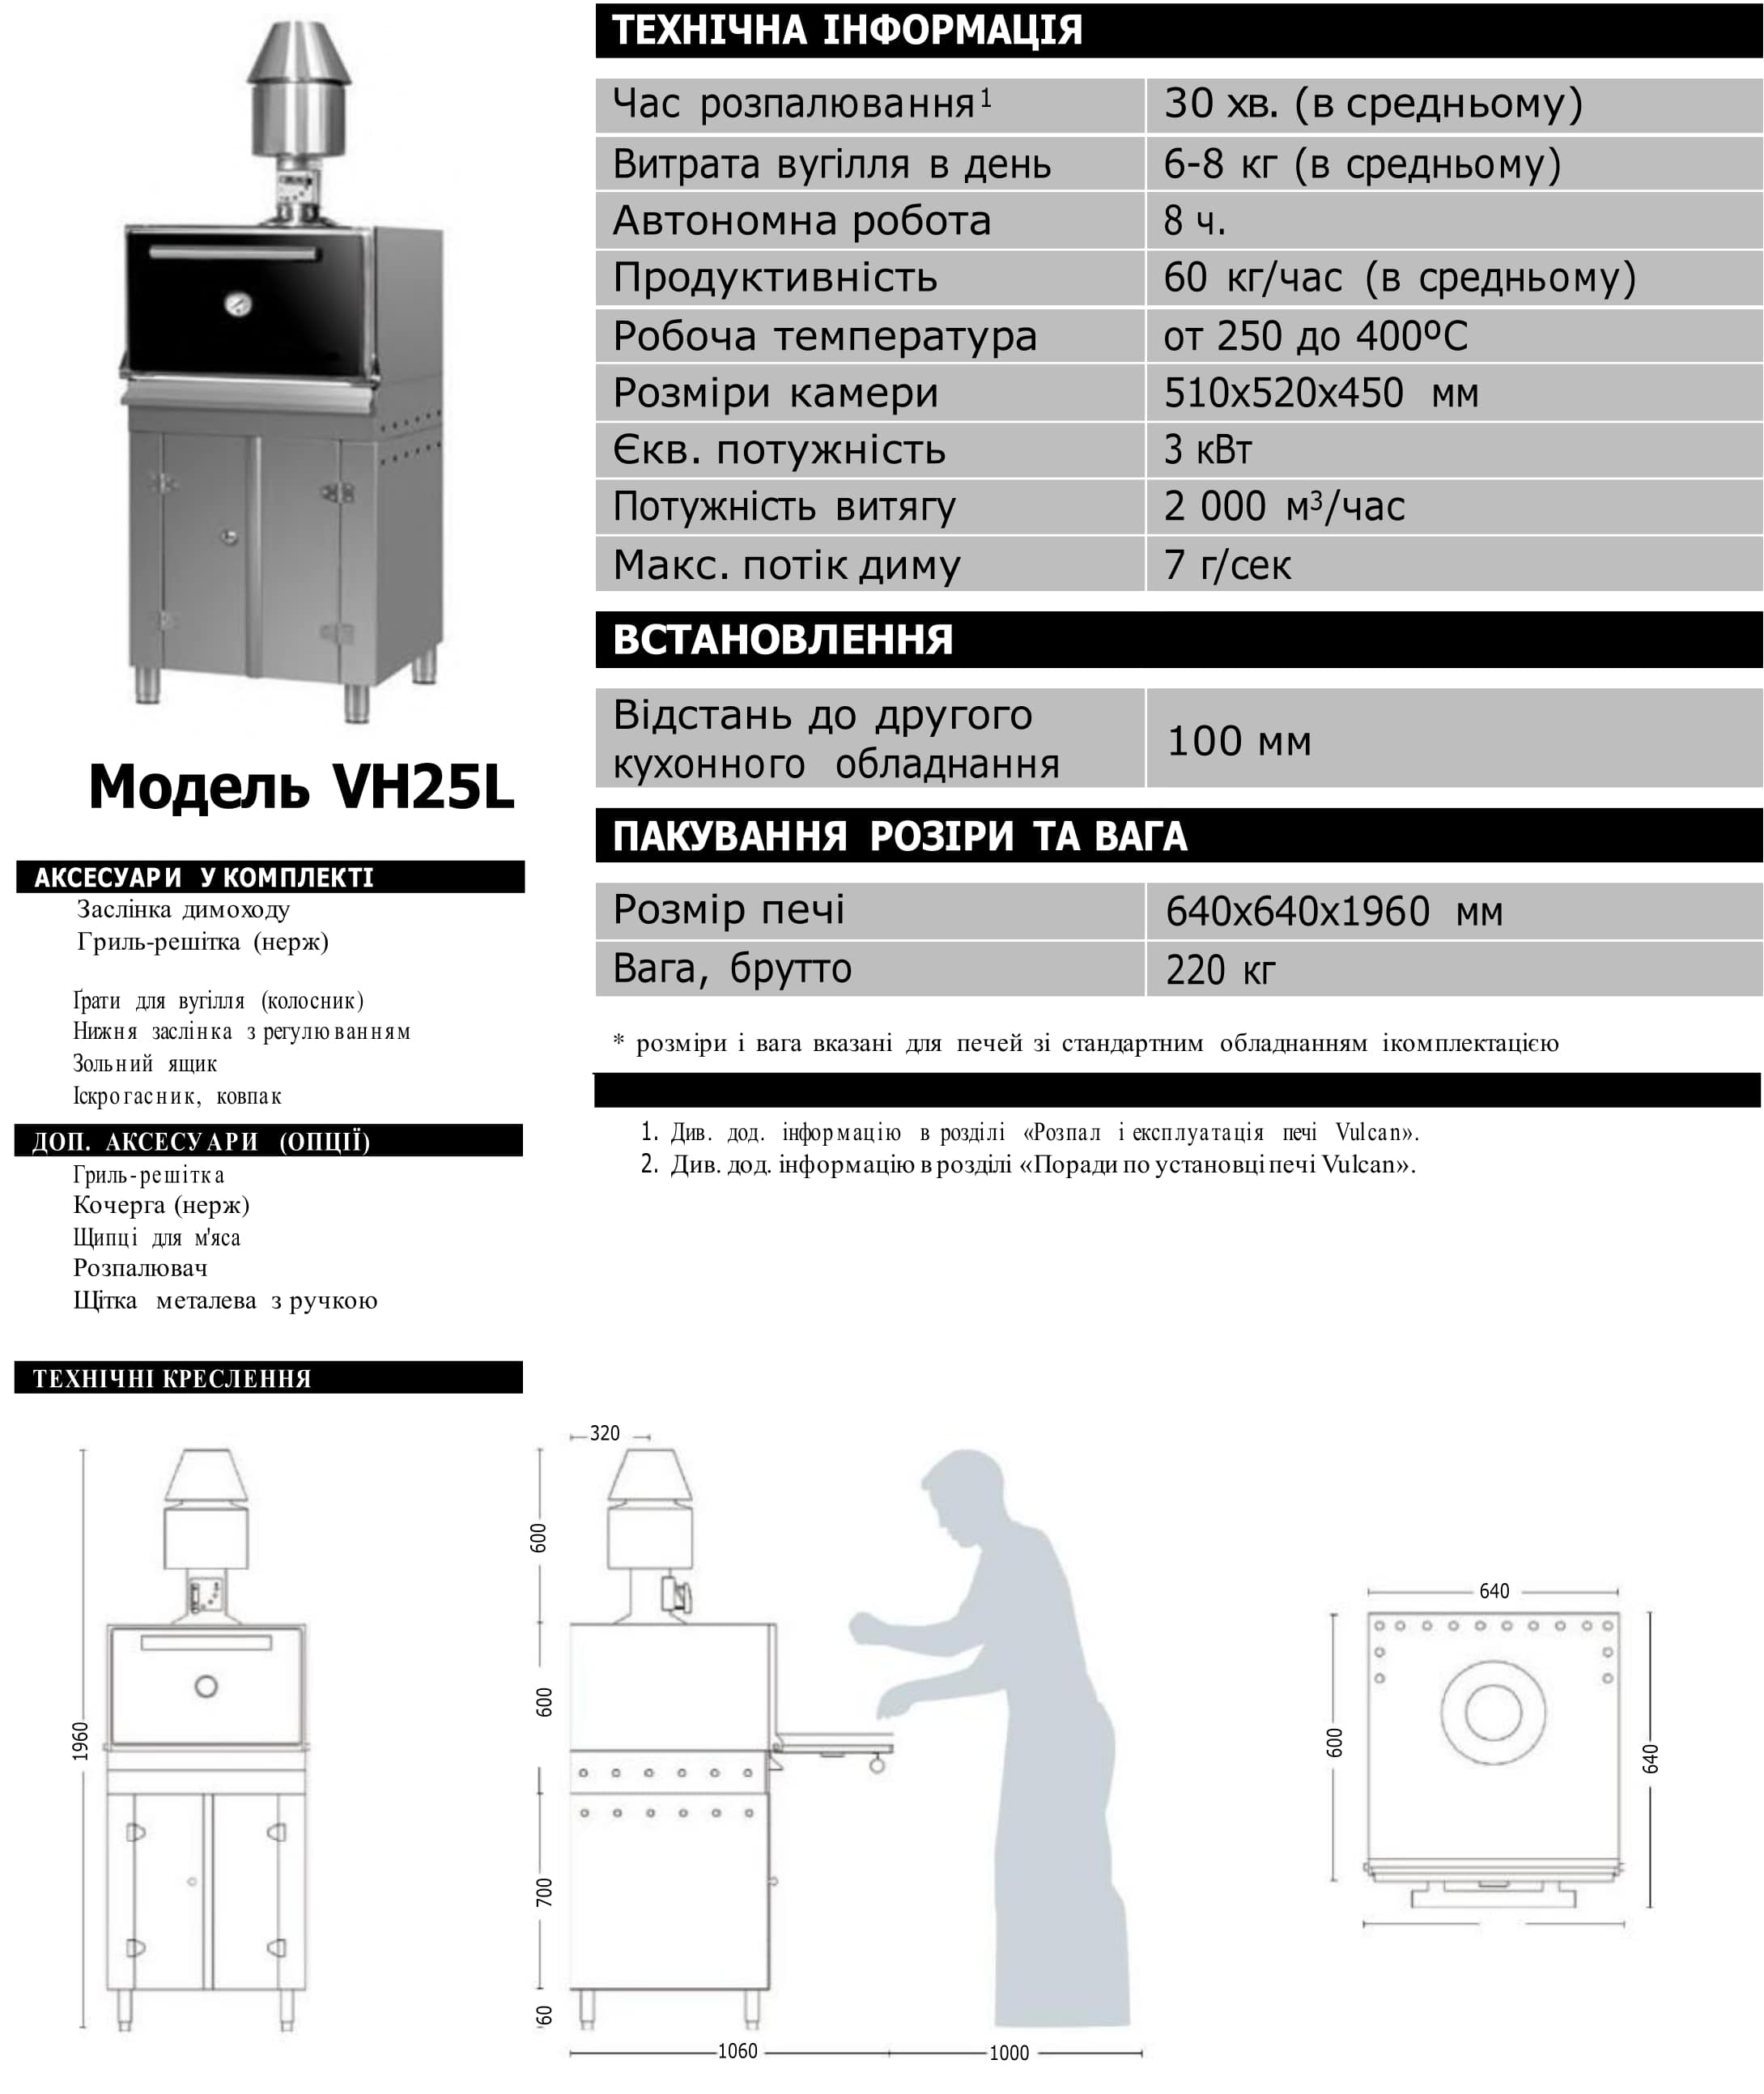
| VH25L | 50-80 | 640х640х1960 | 510х520 |
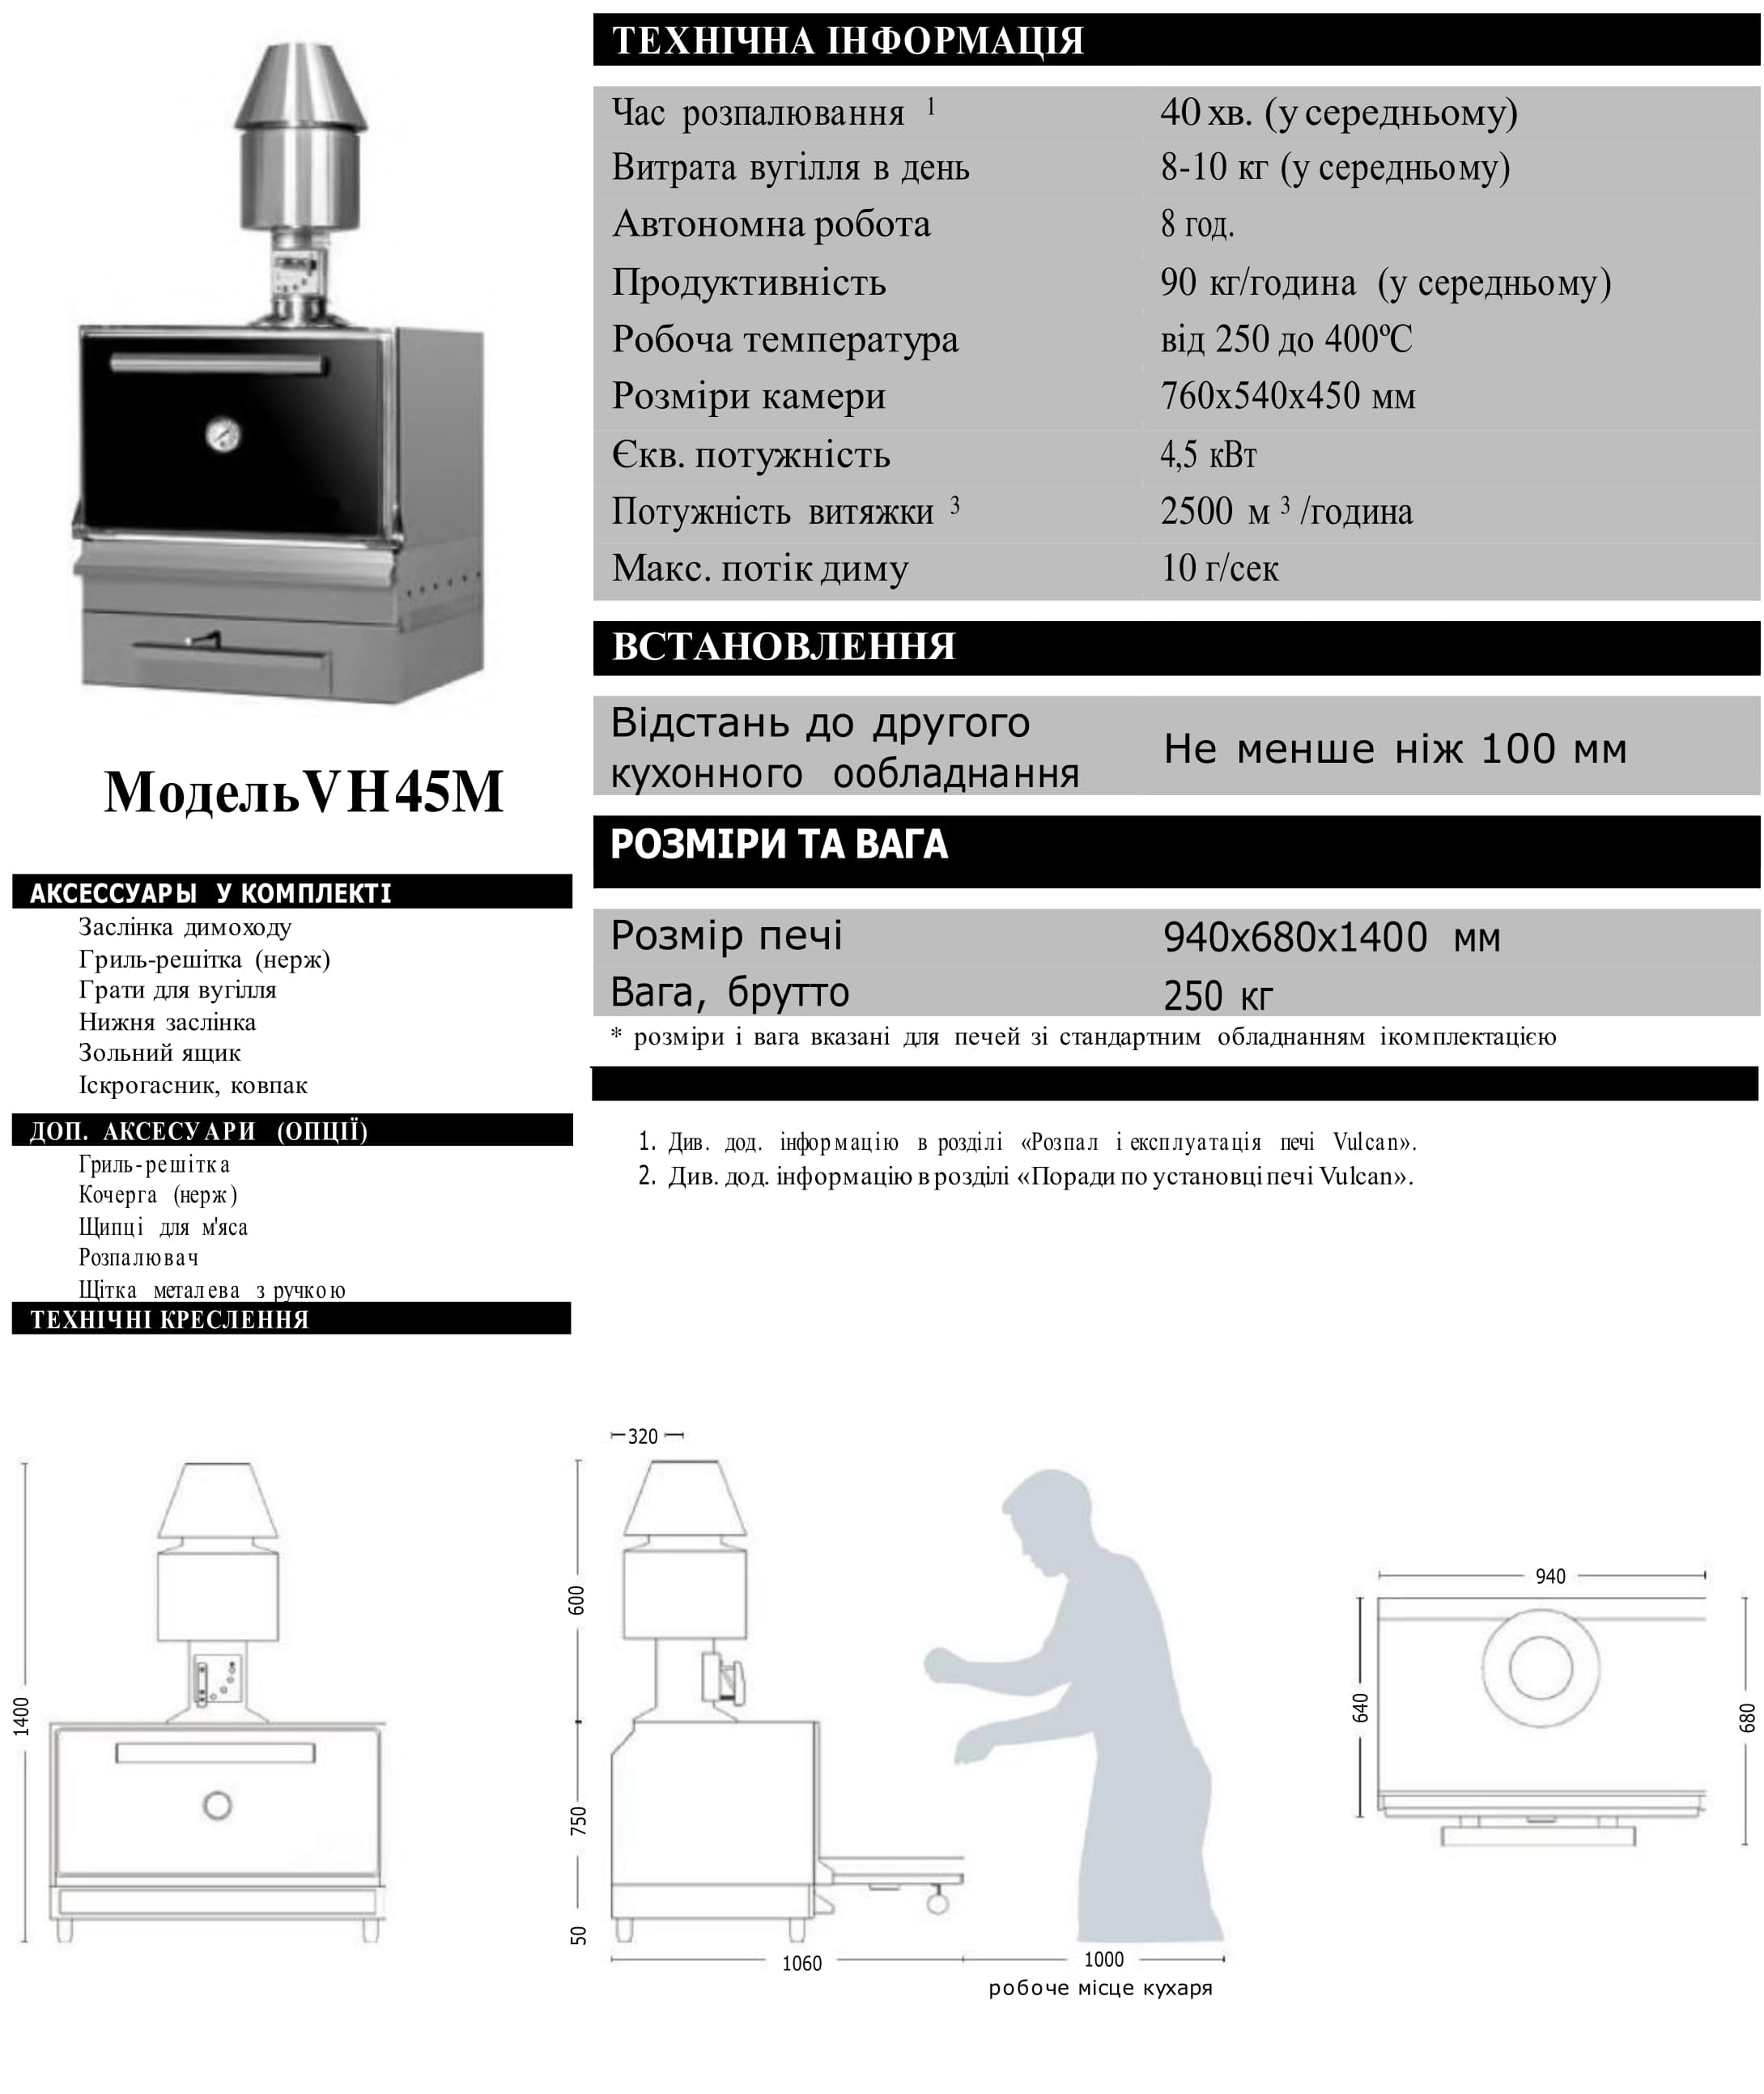
| VH45M | 100-150 | 940x680x1400 | 760х510 |
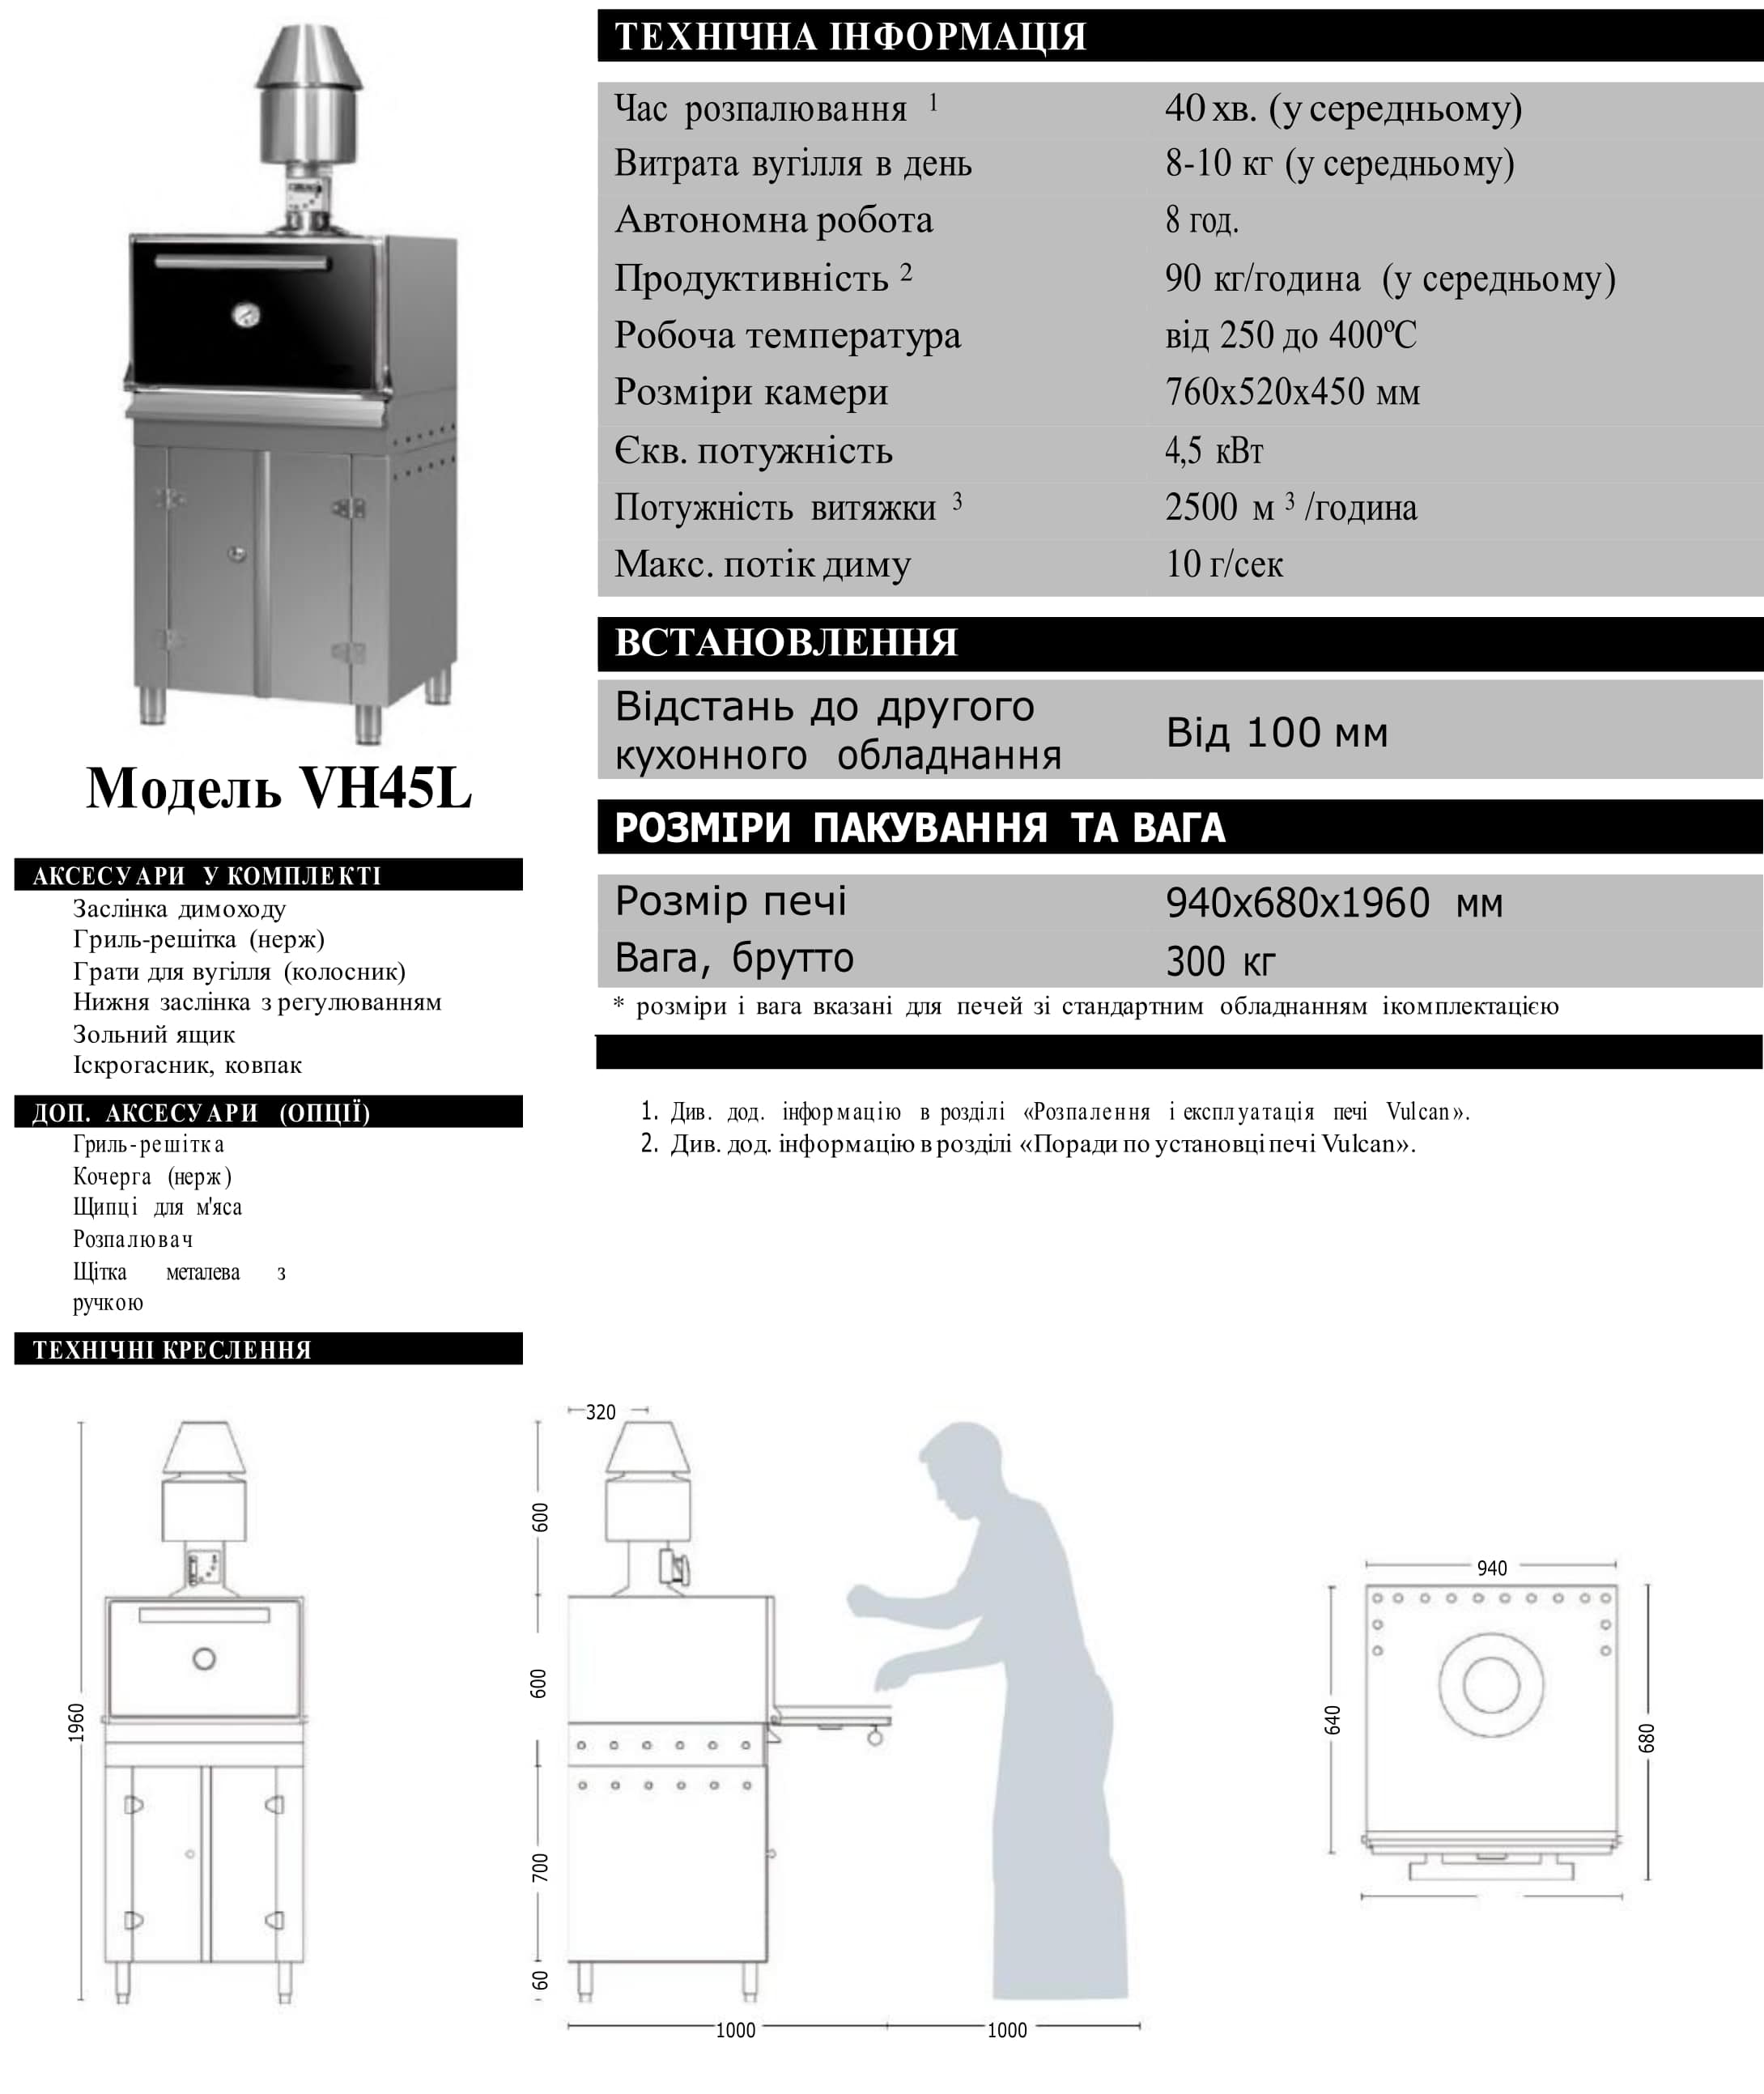
| VH45L | 100-150 | 940x680x1960 | 760х510 |
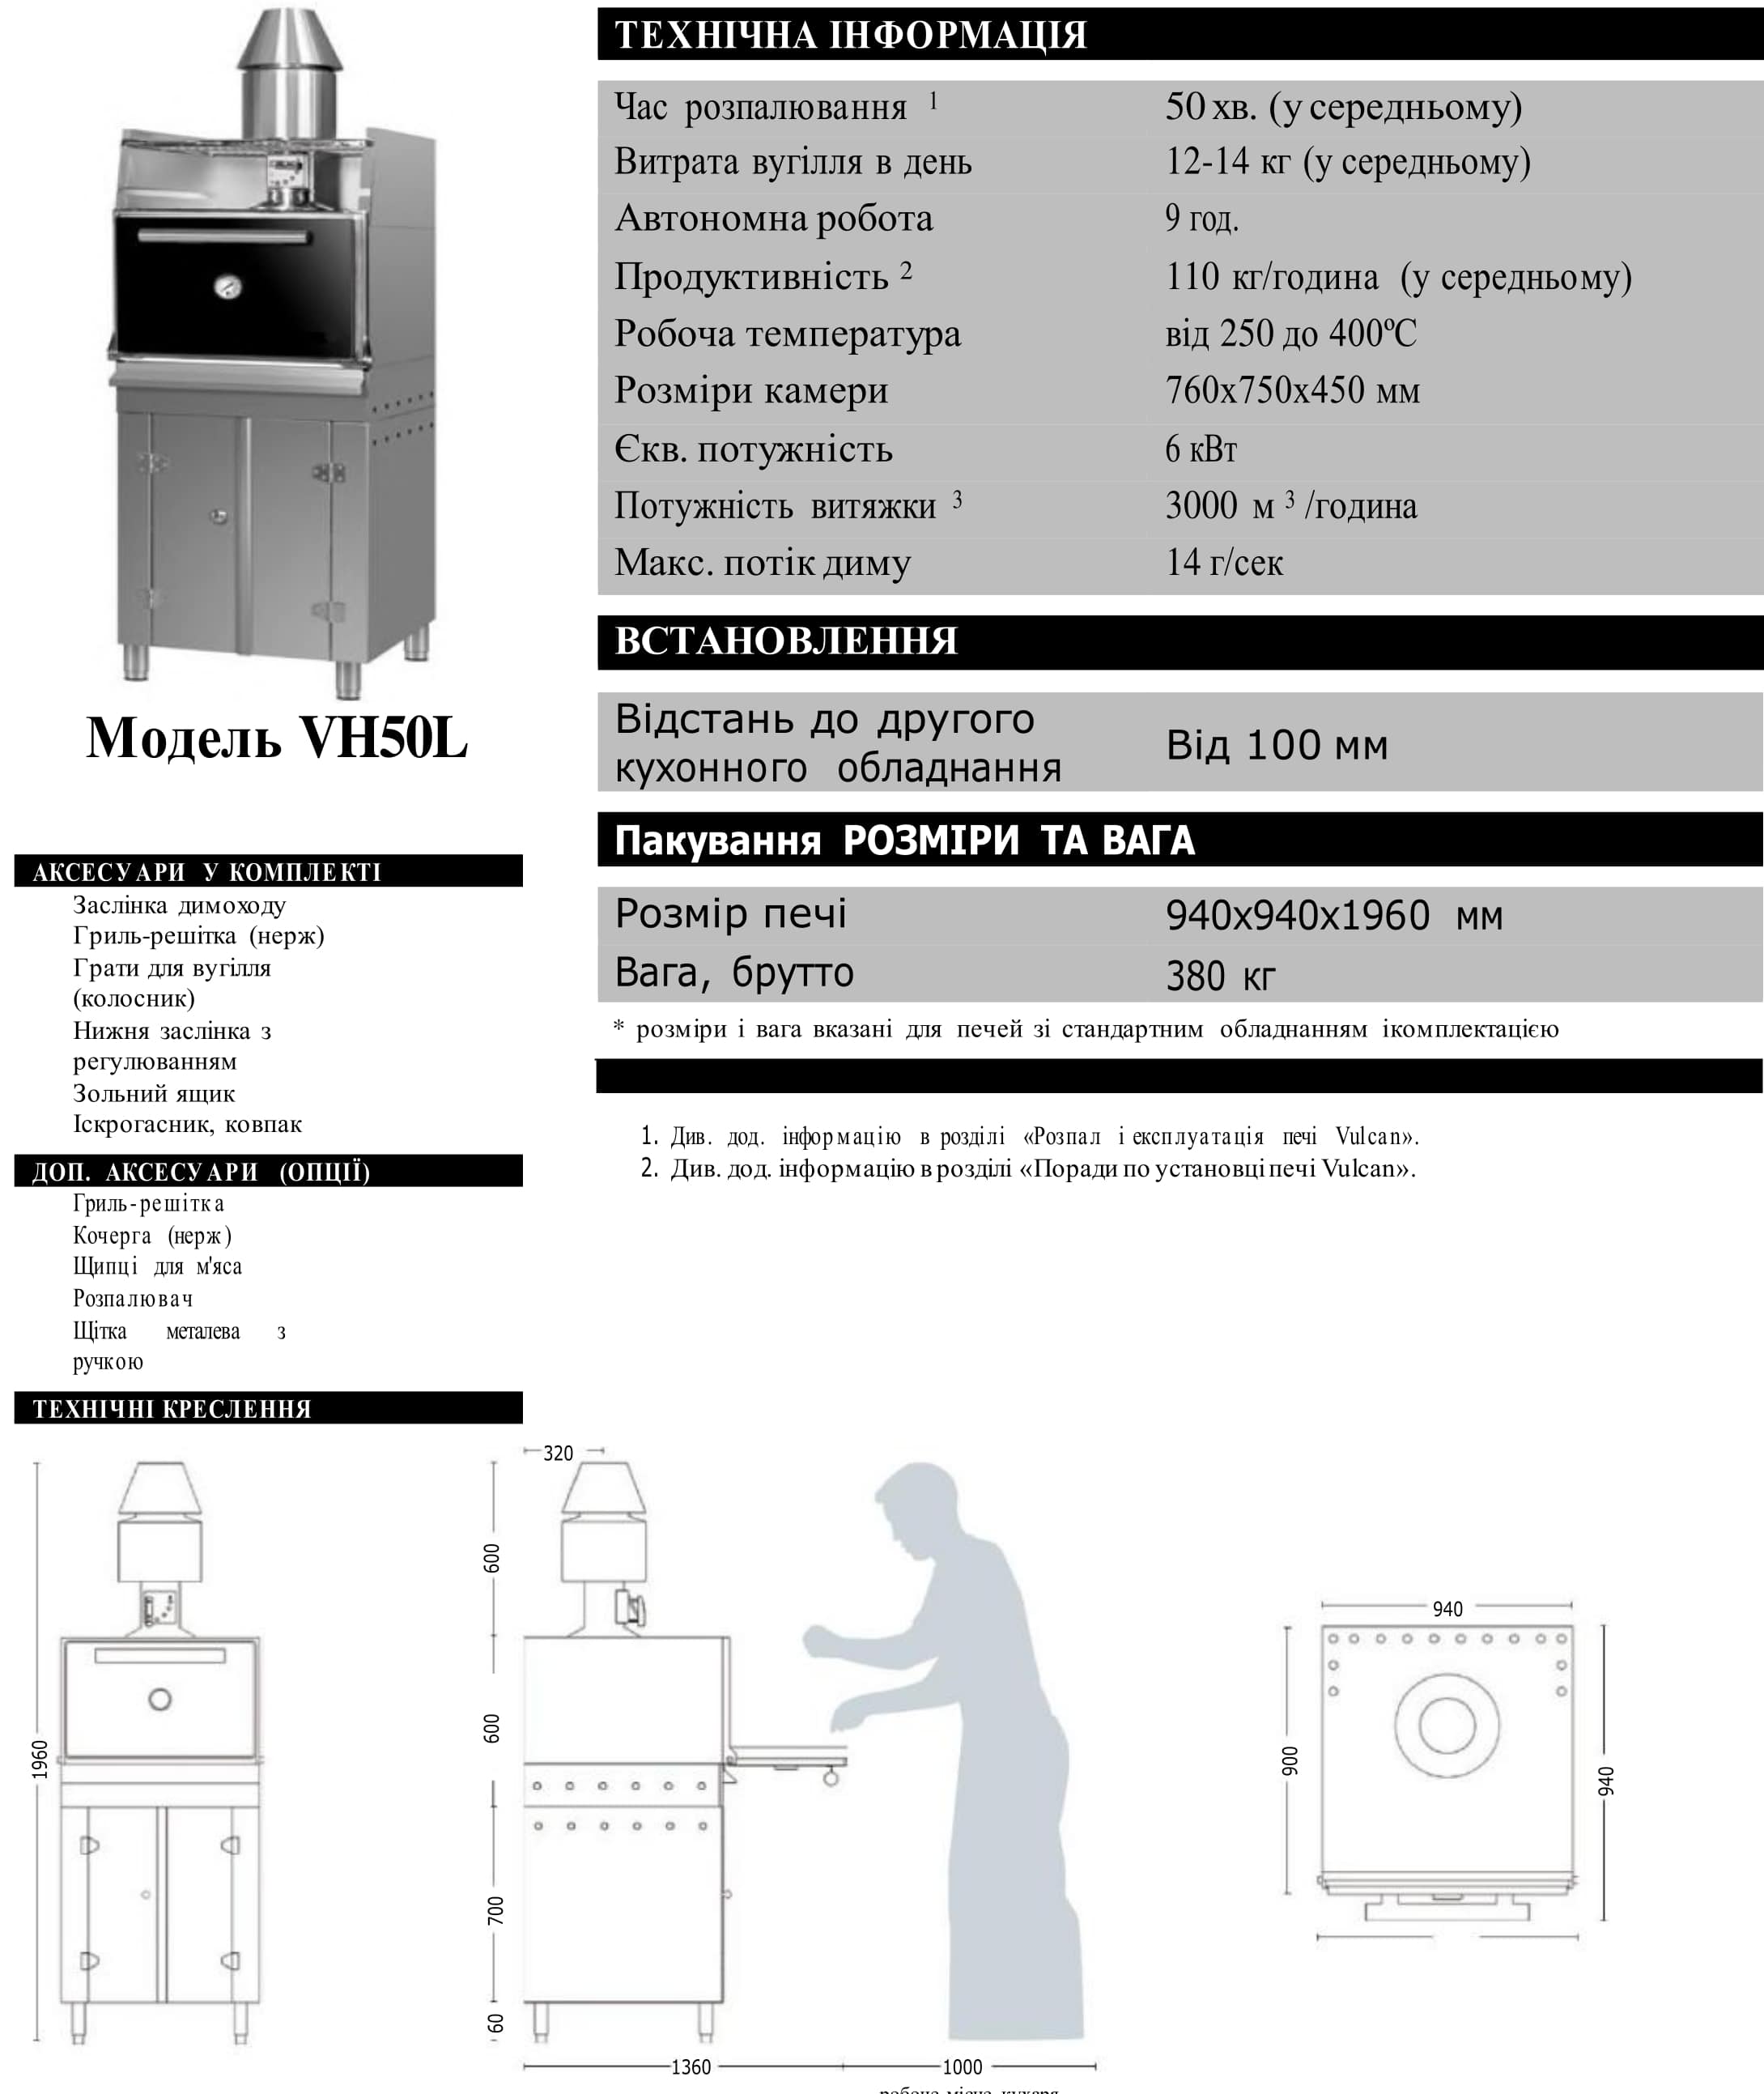
| VH50L | 150-200 | 940x940x1960 | 760х750 |
The VH25L model is perfect for cafes, bars, small restaurants, or larger ones where the "Josper menu" is not the main focus. It can handle seating for up to 100 people.
The dimensions of the VH45M and VH45L models are suitable for any type of restaurant. These models are also considered optimal for achieving the correct grilling heat, i.e., the optimal ratio of initial charcoal load (8-10 kg) to maintain a stable temperature of 300-400 °C. These models are designed for seating from 100 to 150 people.
The VH45M model is notable for the absence of a pedestal cabinet and ash box. Be careful when choosing this model! It is suitable for installation in an existing grilling complex or as an economical option for outdoor catering.
The VH50L model is recommended for catering banquets and public catering establishments. Thanks to the increased grill depth, it can handle seating for up to 200 people.
OVEN CONSTRUCTION

TECHNICAL SPECIFICATIONS
| Model | VH25L | VH45M | VH45L | VH50L |
| Ignition time (average), min | 30 | 40 | 40 | 50 |
| Product output, kg/h | 60 | 90 | 90 | 110 |
| Coal consumption per 8-hour day | 6-8 | 8-10 | 8-10 | 12-14 |
| Operating temperature, °C | 250-400 | 250-400 | 250-400 | 250-400 |
| Equivalent power, kW | 3 | 4 | 4.5 | 6 |
| Grill grate size, mm | 510х520 | 760х510 | 760х510 | 760х750 |
| Exhaust power, m3/h | 2000 | 2500 | 2500 | 3000 |
| Maximum smoke flow, g/s | 7 | 10 | 10 | 14 |
Materials used in the production of Vulcan grill ovens: heat-resistant cast iron (frame around the doors and the doors themselves, charcoal grates), the oven chamber is made from a solid 6 mm boiler steel sheet.
Insulated on all sides with basalt fiber. The top casing and the lower stand are made of AISI 430 stainless steel 1-2 mm thick, and the inner side of the oven doors has a removable 5 mm stainless steel plate.
All casing fasteners are threaded and can be easily assembled and disassembled. There are retractable handles on all four sides for transportation, and inside the stand there is a shelf and an ash drawer. The grill oven comes with a grill grate made of heat-resistant AISI 310 stainless steel, a stand, and a spark guard with a cap. Optional accessories include: poker, meat tongs, fire starter, metal brush with handle. For insulation, a ceramic basalt layer is used, capable of withstanding temperatures up to 1000 °C.
ACCESSORIES
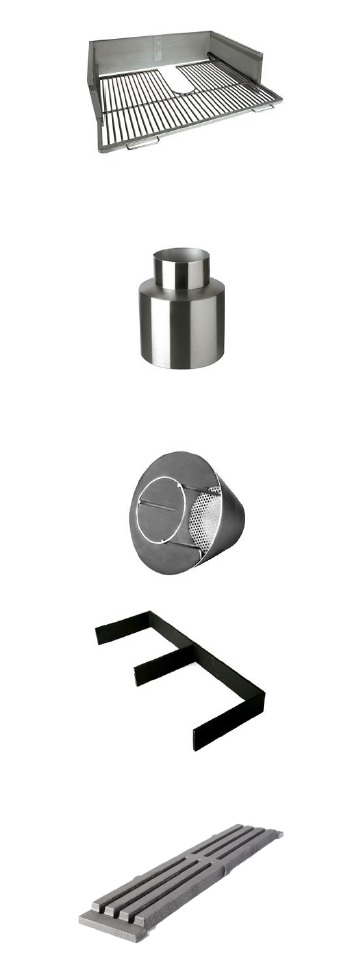 |
SHELF FOR PRODUCT «RESTING» Perfect for maintaining the temperature of a ready dish or for resting meat before serving. Also used for drying, curing, and aging according to various recipes |
|
SPARK GUARD Prevents sparks and flames from entering the ventilation pipes. Replacement is recommended every 24 months of use. If burned, it becomes dangerous and may cause sparks to enter the ventilation system. |
|
|
STAINLESS STEEL CAP Reduces the temperature of the exiting smoke and ensures its smooth flow into the hood without any turbulence or backflow. |
|
|
CHARCOAL FRAME (for 4L, 5L models) Allows limiting the area designated for lighting charcoal, helps save charcoal when there are few orders. |
|
|
GRATES Made of heat-resistant cast iron, withstand burning temperatures up to 700 °C, serve as a base for lighting charcoal. At high temperatures (above 500 °C), they may deform and require replacement (not covered by warranty).
|
GUIDELINES FOR INSTALLING VULCAN OVEN
When installing a grill oven under an exhaust hood, it is necessary to consider the following important factors:
- Installation possibilities of the grill oven.
- Dimensions and construction of the exhaust hood.
- Diameter of the exhaust duct and extraction power.
1. If you plan to install the Vulcan grill oven in a standard kitchen with existing ventilation, a hydrofilter is absolutely required. When selecting a hydrofilter, it is important to pay attention to calculating the fan power. Fans come in 3 types (duct, roof (chimney), and standard «snail»).
It is important to install a speed controller to regulate exhaust power and save coal consumption.
IMPORTANT!!! Understand that the spark arrestor included with the grill oven does not eliminate sparks that fly out when opening the doors during cooking.
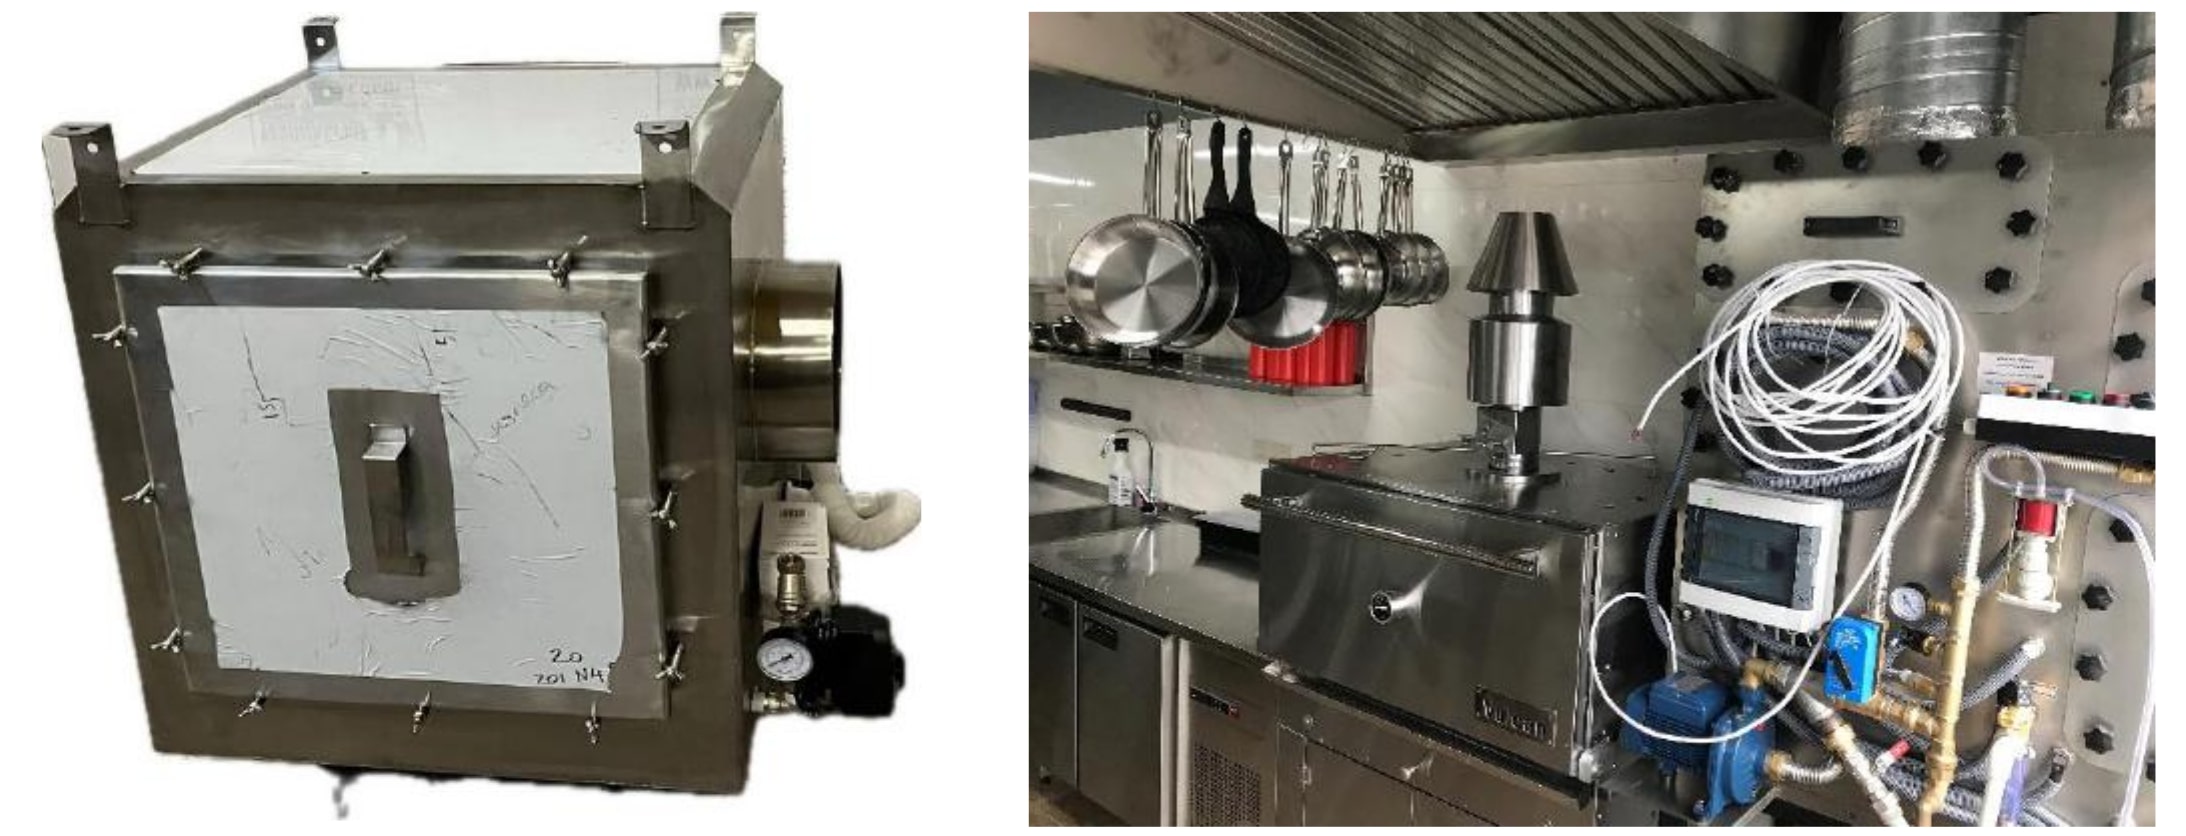
If possible to run through a separate exhaust, it is sufficient to install the correct hood with a spark arrestor. In this case, the cap and spark arrestor on the oven itself are also mandatory. This eliminates sparks from the chimney – with the built-in spark arrestor, as well as when doors are open – through the additional hood with spark protection. For open kitchens, a closed-type hood with false panels is also recommended. False panels are attached directly to the grill oven and prevent smoke leakage into the dining area, directing smoke and possible sparks into the hood.
There is another option for oven installation:
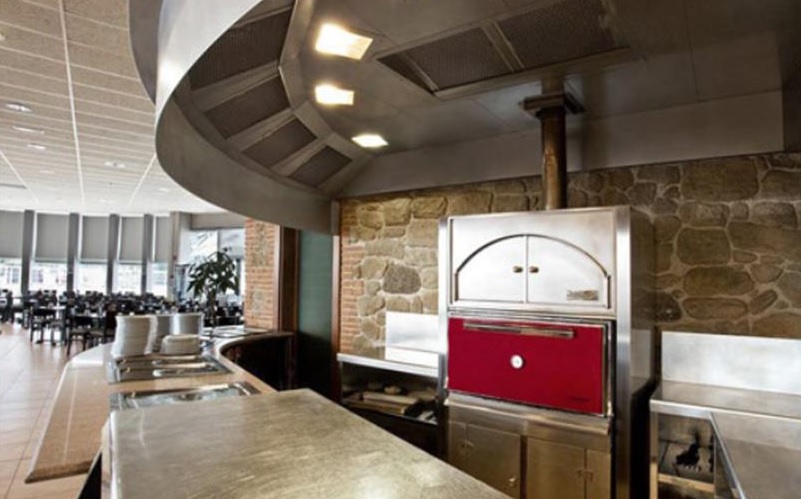
In this case, the grill oven connects directly to a separate duct with direct exit outside (straight-through). The hood with spark arrestor is also mandatory. And if the hood is connected to the general kitchen exhaust, a hydrofilter is also required.
WARNING!!! Based on statistics of fires in food establishments with similar ovens installed, fires occur due to improper installation and operation of equipment. In 80% of cases, fires occurred due to sparks when opening the grill doors. Sparks enter the grease-contaminated ventilation through the exhaust hood and cause a flare-up.
2. Regarding the hood design, the ideal solution is to install hood filters in the front, not at the back as in standard kitchen hoods.
Also, consider the option of installing an exhaust hood with air supply (air curtain) to compensate for the airflow from the kitchen and prevent smoke from entering the kitchen or dining area. Recommended for open kitchens and when placing the grill oven in the dining area.
Attention!!! All aspects of Vulcan grill oven installation must be approved and coordinated with local fire safety authorities according to existing regulations and rules for solid fuel ovens.
Regarding hood dimensions, it must be deep enough to cover the oven and doors in the open position. For example, for the Vulcan5L model with a depth of 870 mm plus 100 mm to the wall, plus 460 mm for the doors in the open state, the hood depth should be at least 1430 mm.
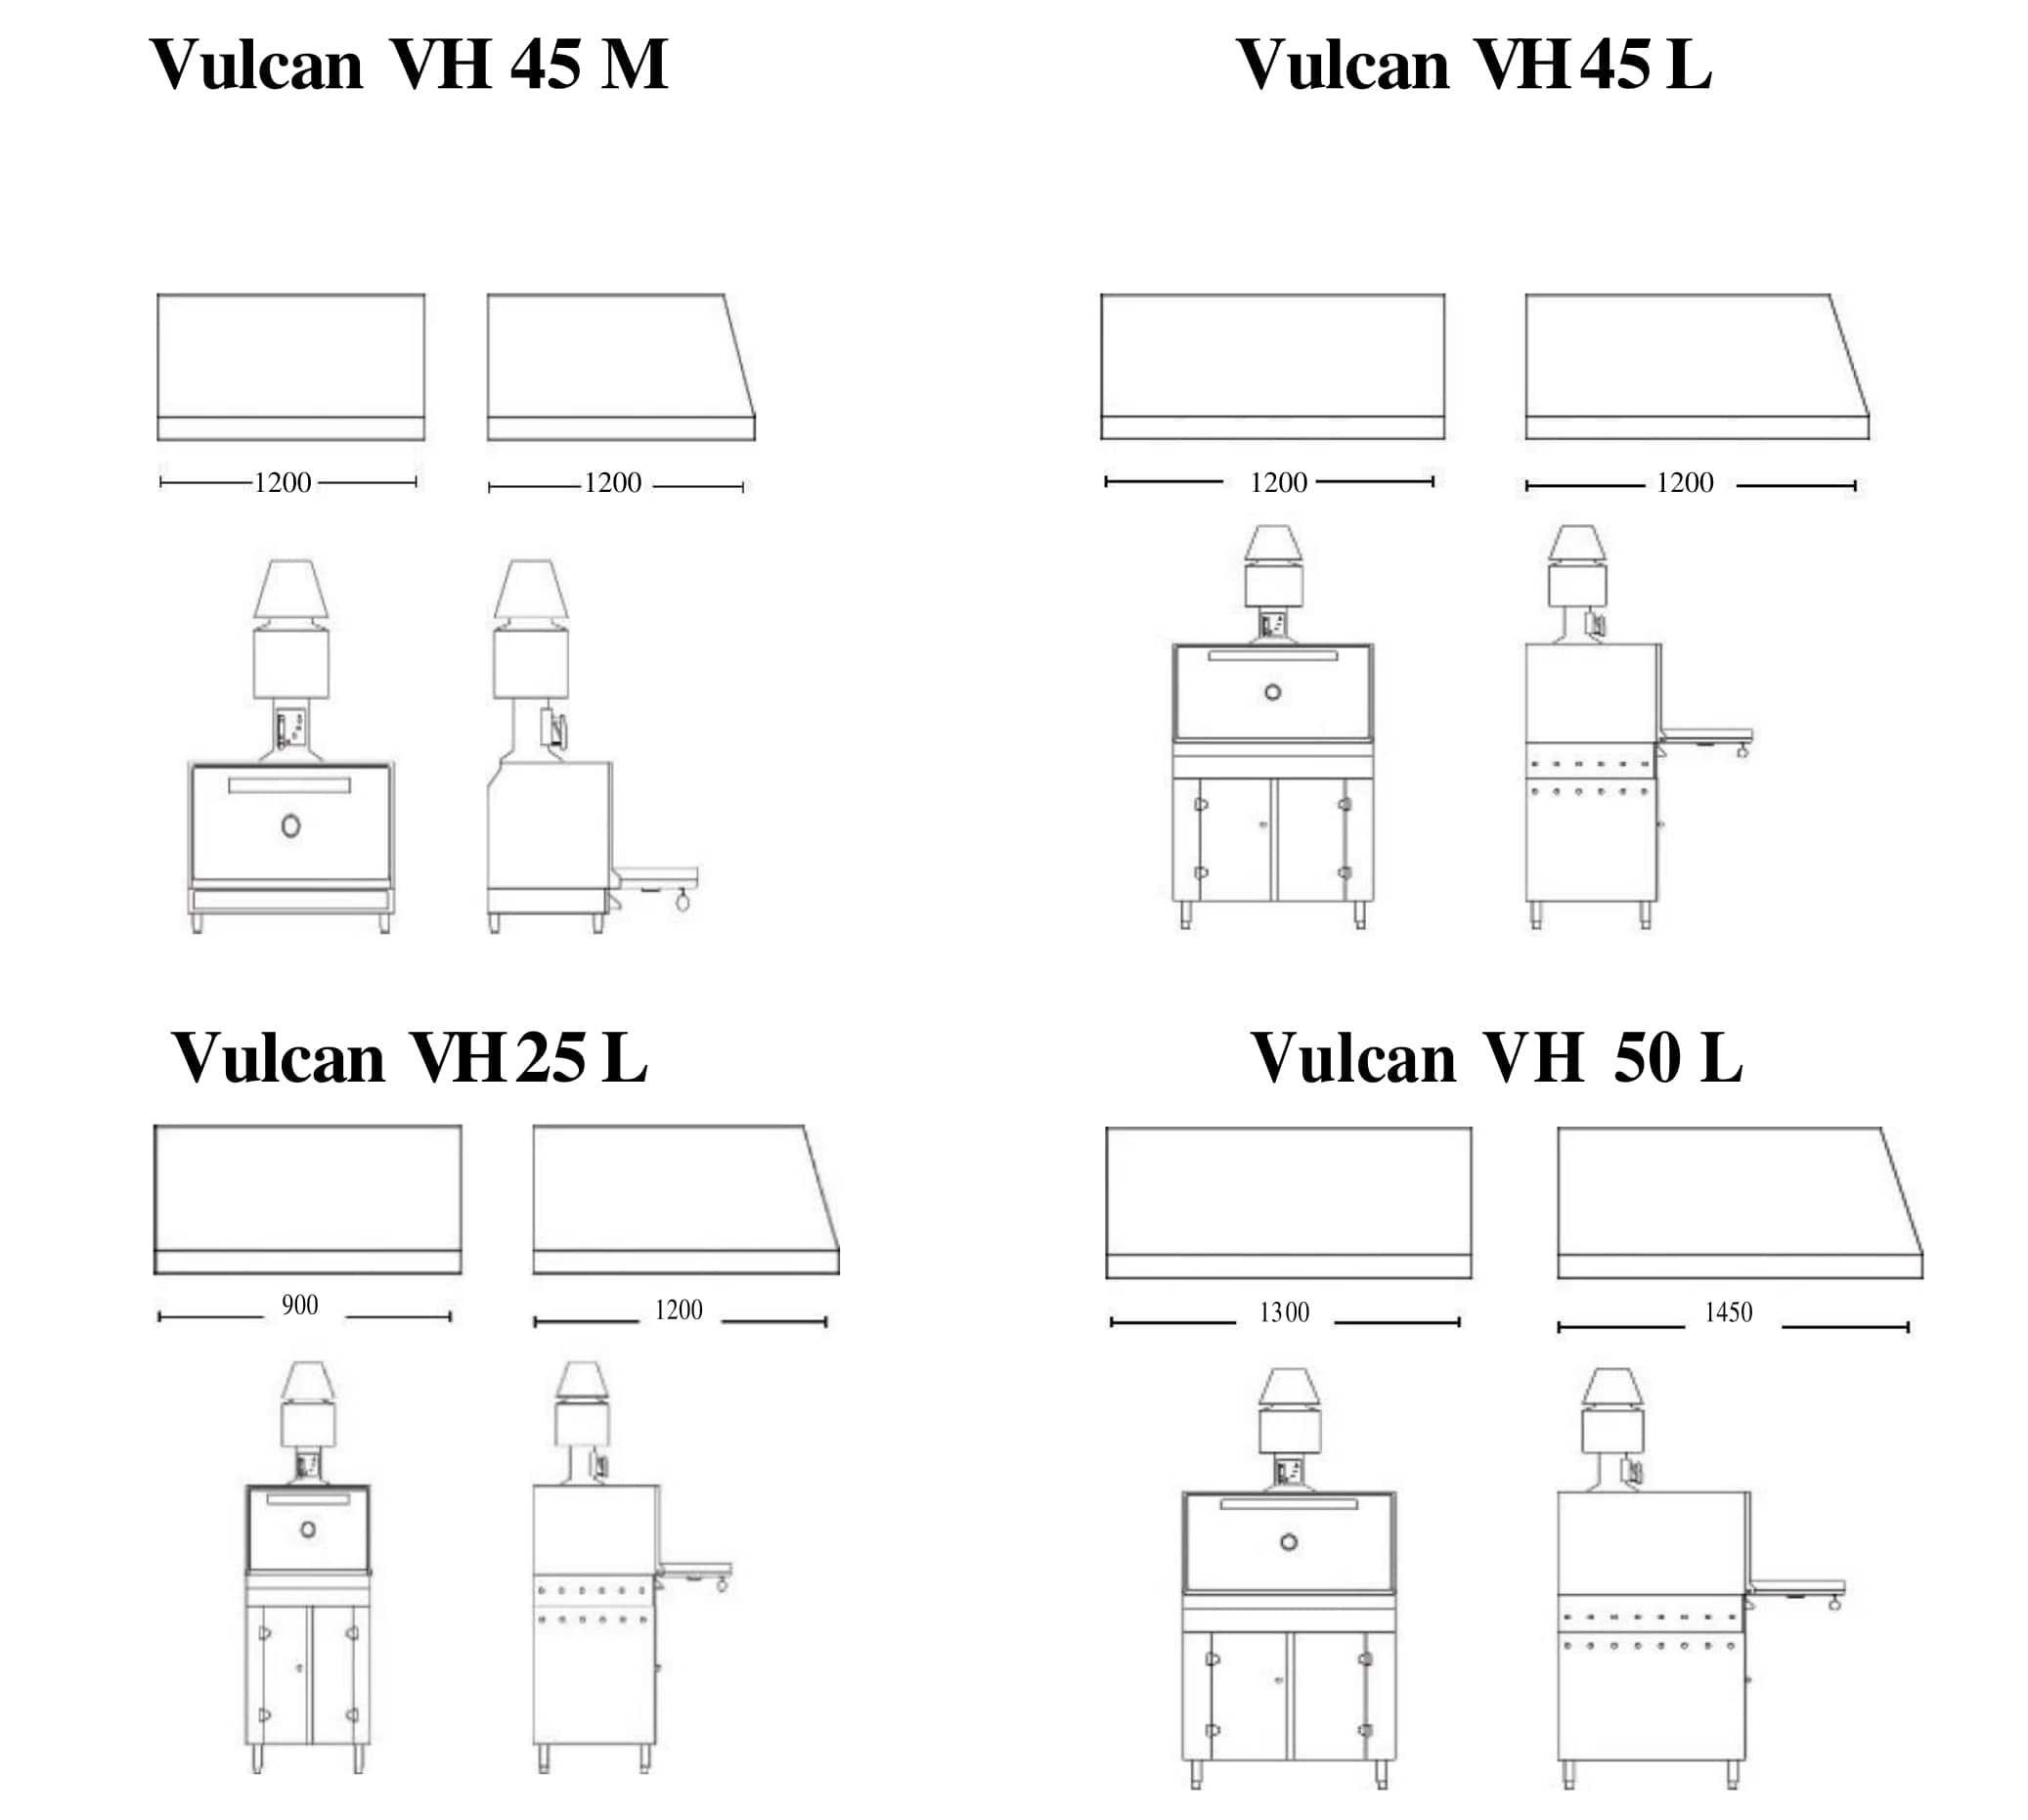
3. For all grill oven models, the diameter of the sandwich duct should be 250/300 mm.
EXHAUST POWER
| Model | VH25L | VH45M | VH45L | VH50L |
| Equivalent power, kW | 3 | 4.5 | 4.5 | 6 |
| Max smoke flow, g/sec | 7 | 10 | 10 | 14 |
| Exit temperature, °C | 155 | 155 | 155 | 155 |
| Recommended draft, Pa | 12 | 12 | 12 | 12 |
| Efficiency, % | 76 | 76 | 76 | 76 |
| Exhaust power, m3/h | 2000 | 2500 | 2500 | 3000 |
IGNITION AND OPERATION OF VULCAN GRILL OVEN
For proper ignition of the oven and its optimal preparation for operation, follow the instructions provided in each corresponding section.
1. LOADING CHARCOAL
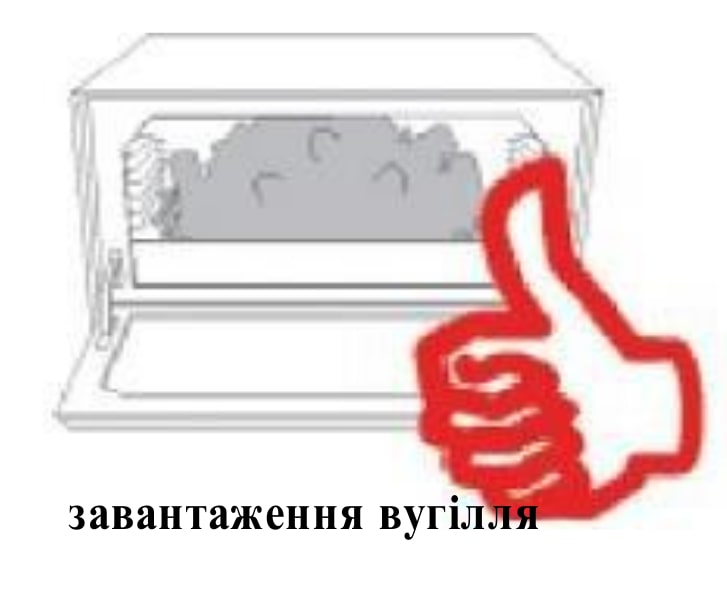
First, remove the grill grates from the oven. To achieve optimal performance and cook with a traditional smoky flavor, use charcoal made from hardwoods (white or red quebracho) in large pieces, or, if not possible, charcoal from similar wood types.
Arrange the charcoal in a pyramid shape in the center of the oven (see illustration on the right), leaving a strip about 15 cm along the back wall free of charcoal. Use a poker to position the charcoal.
Charcoal consumption depends on the model and draft adjustment. One load should last 6-8 hours:
| OVEN MODEL | CHARCOAL AMOUNT |
| VH25L | 8 kg |
| VH45L | 10 kg |
| VH50L | 14 kg |
2. LIGHTING THE OVEN
At this point, it is very important to check the position of the dampers of both drafts (upper and lower). For lighting the oven, both dampers must be OPEN!!! This is the first thing to do at the start of work on the grill oven.
The lower image on the right shows the position of both dampers and the actions required.
Remember that at the moment of lighting the charcoal, the grill racks must be removed from the oven (image on the left).
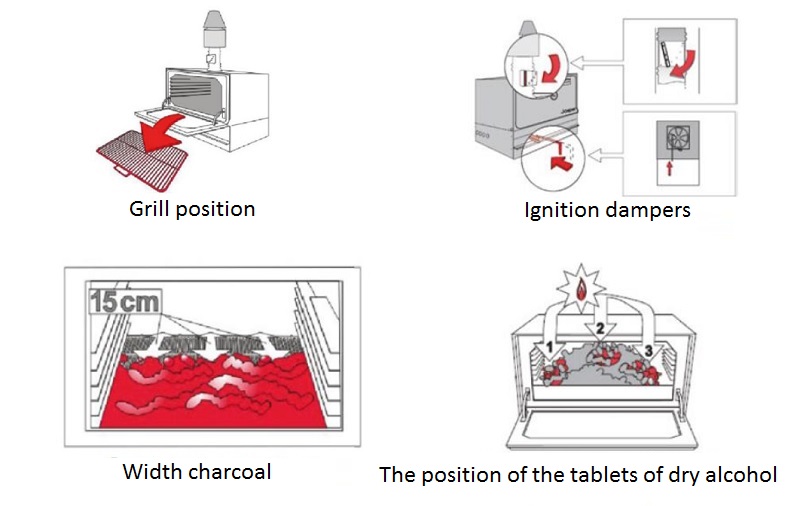
The image on the right shows the placement of three charcoal ignition tablets: one in the center and two at the edges. Use dry alcohol tablets for lighting. Never use flammable liquids! It is very dangerous!
Close the door and allow the charcoal to heat up. After 30-40 minutes, the charcoal should be evenly heated, glowing, and reach the state when there are no visible flames. At this moment, it is necessary to level the charcoal across the entire internal width of the oven using the poker, as shown in the image on the left.
Next, close the lower damper, as shown in the lower image on the left.
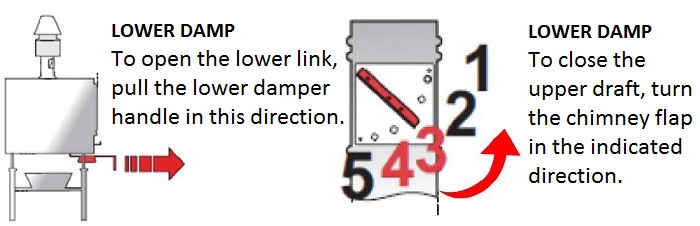
After 10 minutes, set the chimney damper to position 3, as shown in the upper image on the right. After completing these last two steps, the grill oven is ready for operation.
3. WORKING MODE
As mentioned above, the oven is now ready for cooking food.
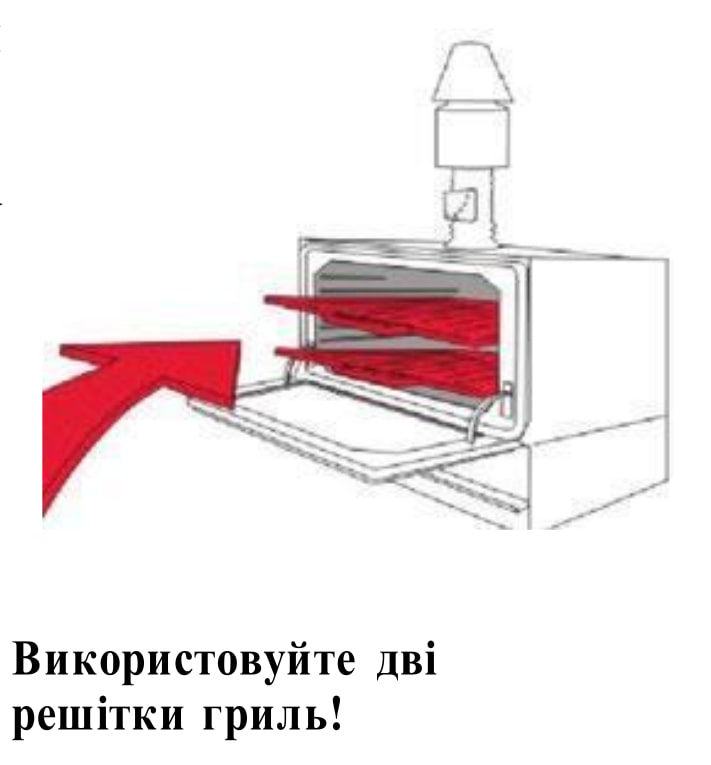
We strongly recommend using two racks. In this case, firstly, the working surface for cooking is twice as large, and secondly, by using two different heights, you can better control the temperature inside the oven.
By changing the position of the upper draft damper, you can prevent smoke from exiting the oven, allowing the product inside to be smoked when necessary. Nevertheless, in working mode, the damper position at setting 3 is optimal for cooking.
4. END OF OPERATION
When you have finished cooking food in the oven, simply fully close the chimney damper (the lower damper was already closed during working mode). Thus, everything is ready for you to leave your workstation.
Closing the regulation of both drafts is an important action in the oven, which you perform throughout the day.
At this point, since there is no airflow, the charcoal is in a "sleeping" state, meaning that to activate the oven again, you need to add charcoal and open both dampers. When airflow is restored, the "sleeping" charcoal is reactivated. If there is no charcoal left in the oven, you must start the preparation process again from point "1" of this guide.
Information about the three grill oven settings can be briefly represented in the following table:
| MODE | UPPER DAMPER | LOWER DAMPER | COMMENT |
| Lighting | Open | Open | First 30-40 minutes of operation |
| Working mode | Position 3 | Close | During operation |
| End of operation | Close | Close | When the oven is not in use |
DAILY AND PERIODIC OVEN CLEANING
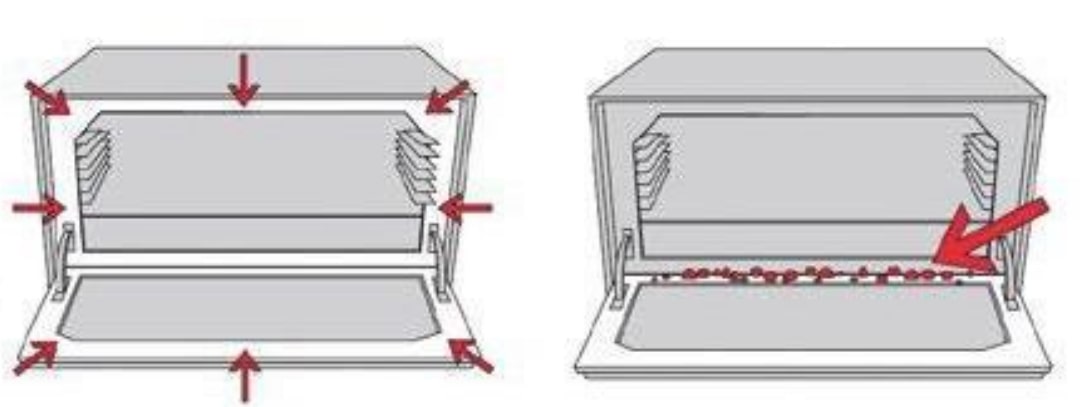
Cleaning: Perform cleaning always in the morning when the grill oven is not hot! It is very important to keep the door frame clean around the perimeter, its inner part, and the inner frame of the oven. This ensures the door closes properly throughout the day.
Ash that has not fallen on its own must be cleaned and collected in the ash box every 3-4 days. To do this, remove the grill grate and grates, then shake the ash into the lower damper opening.
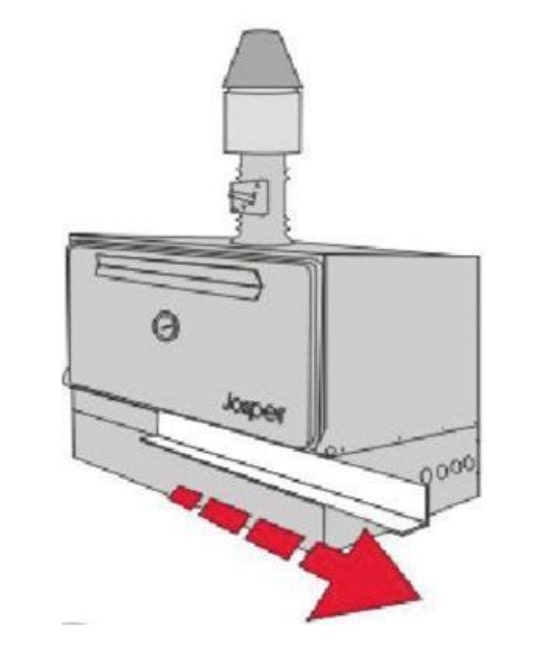
Also, the drip tray under the door and the hood above the spark arrestor should be washed.
It can be washed in a dishwasher or by hand.
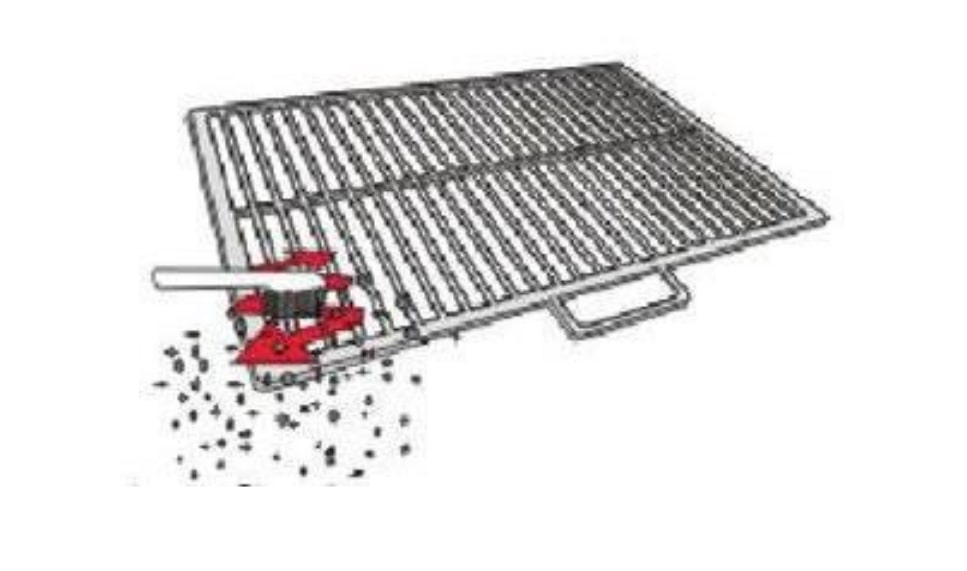
Grill grate should be periodically cleaned with a metal brush between cooking sessions.
Never use water to clean the spark arrestor. Simply remove and shake it to remove soot and dust inside.
ATTENTION!!! We strongly recommend thoroughly reading our instructions. The end user bears full responsibility for fire safety regulations concerning the solid fuel ventilation system, and hygiene standards (regular cleaning of the hood, filters, and other parts where grease and soot may accumulate).